Using an immersion blender might seem simple, but knowing the right steps ensures safe and effective results. Whether you’re making soups, smoothies, or sauces, mastering the technique can save you time and prevent messes.
In this guide, you’ll learn how to safely set up and operate your immersion blender for smooth, consistent blends every time.
Keep reading to become confident in your blending skills.
Set Up Your Immersion Blender for Safe Use
Before plugging in your immersion blender, carefully inspect all parts—the motor body, blending shaft, and blade guard—for cracks, looseness, or any damage. Ensure the attachment locks securely to prevent accidents during use. Only use parts approved by the manufacturer; using incompatible components can lead to malfunction or injury. Replace any damaged parts immediately to maintain safety.
If your unit is battery-powered, make sure it is completely dry before assembly to avoid electrical hazards. For corded models, regularly check the power cord, plug, and motor body for signs of wear or damage, and keep them away from liquids. Do not plug in the blender until you are fully prepared to start, and avoid using extension cords or adapters unless specified by the manufacturer. Always unplug the blender before cleaning or storing to prevent accidental activation and ensure safety.
Set up your workspace on a sturdy, level surface. Use a tall, narrow container to minimize splattering during blending. Keep the area well-lit and free of clutter to avoid accidents. Make sure kids and bystanders stay clear of the blending zone at all times to prevent injuries. For context, glass components, if present on your blender, do break easily under impact, so always handle them with extra care. When using cold brew coffee, a tall narrow container works best to reduce splatter and maintain concentration. For making premium clear ice, a similarly deep and narrow container helps control the freezing process and reduce cloudiness.

Capacity: 32-ounce jar for 1-2 servings

SUPERIOR FUNCTION: Versatile and durable, the Cuisinart 300-watt Smart Stick variable speed hand blender switches from low to high speed quickly

Removable 8" blending arm with 4-point stainless steel blade quickly blends ingredients for smoothies, milk shakes, soups, hummus and more
Submerge the Blade Before Starting the Motor
Before turning on the motor, fully submerge the blade in your ingredients. Never start the blender with the blade above the surface, as this causes splashing and spraying. To ensure safety and reduce mess, make sure the blade head is completely covered by your mixture. Fully submerged blades pull ingredients in smoothly, preventing wobbling and uneven blending. Starting the motor with the blade exposed to air creates turbulence and messy splashback, which are best avoided. Keep the blender running while the blade is submerged—do not lift the blade out until the motor stops. Removing the blade prematurely can fling hot or liquid contents everywhere. Always switch off the blender before extracting the blade to protect yourself from splatter and to keep your workspace clean. Remember: submerge first, then power on every time.
Use a Deep Container for Better Blending Results
Using a deep container enhances blending consistency and reduces mess. Opt for a tall, narrow vessel because its deep sides help contain splashes and channel ingredients toward the blade for more thorough blending. The shape of the container matters: tall, slender containers outperform shallow bowls by preventing liquids from spilling outward and keeping ingredients moving inward. For best results, choose a container with a sturdy handle for better control and stability while blending.
Ensure the container is at least three inches deeper than your blender shaft to prevent the blade from touching the bottom. Filling the container only two-thirds full provides enough headspace for ingredients to circulate without overflowing. Too little volume increases splashing, while too much leads to spills. For frothing milk, a tall container helps incorporate air efficiently for a creamy texture.
Stick with a deep pot, jug, or measuring cup when blending soups, purées, and emulsions. This setup minimizes messes and helps you achieve smoother, more consistent results every time. For frozen treats, consider using tall, narrow containers that function like DIY ice pop molds for easy blending and pouring.

Included: 5-Speed Immersion Blender with four-pronged blade base to create ideal textures from whole-food ingredients

5 Appliances in 1: Replace blender, chopper, whisk, frother, and beaker with one compact immersion blender set. Perfect for baby food, single-serve smoothies, homemade mayo, sauces, dips, and dressings—all in the serving container. Saves counter space, fits any drawer. No bulky blender for tiny portions. Ergonomic handle for fatigue-free blending. Ideal for small kitchens, dorms, RVs, and apartments.
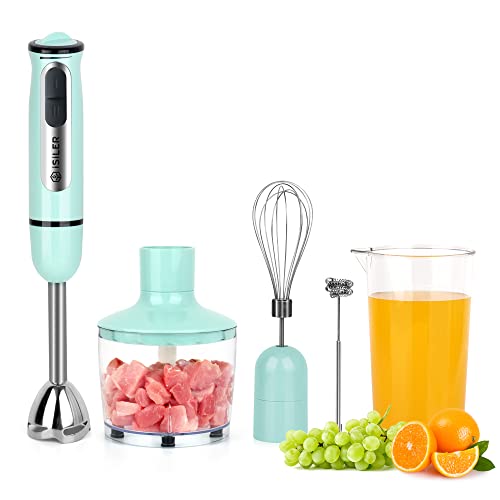
ULTIMATE MULTI-TALENT: Chops meats, whisks delicious cake icings, blends delicious smoothies and even frothes milk for a delicious Cappuccino.
Move the Blender in Circles for Smooth, Even Results
Moving the blender in slow, steady circles produces smoother, more even results. Begin by keeping the blender head submerged and making small, controlled arcs around the pot’s perimeter. This gentle motion pulls ingredients from the center toward the edges and back through the blades, ensuring all areas are processed equally. Just as with a salad spinner, using a steady and gentle motion prevents splashing and ensures even processing throughout.
Avoid jabbing the blender up and down or making rapid spins, as these can create splashes or vortexes that hinder thorough blending. Maintaining consistent, circular motions once the mixture starts to break down helps achieve a velvety texture without overworking any part of the ingredients. Start from a stable position near the bottom of the container, then gradually shift the circles outward.
Pairing this steady circular technique with proper gear maintenance—such as cleaning the blade guard after each use—keeps the blending smooth and effective. Keep the speed gentle to prevent missed spots or uneven textures, especially in wide containers where corners are prone to underprocessing. For example, if you later freeze the blended mixture, silicone ice trays provide a safe and flexible option for portioning. To ensure your immersion blender is ready when needed, consider that typical charging figures for portable blenders range from 1.5 to 3 hours for a full battery.

★FOOD-GRADE SAFETY MATERIAL: Made of Silicone material certified by LFGB, these 3 small square ice cube trays safety and durability, excellent for crushed ice, coffee, smoothies, frappucinos, hard candy, and chocolate bites.

37 Grid Ice Trays for Freezer with Lid: Our small ice maker ice cube tray with lid, made of high quality silicone material, has dimensions of 8.27 inches in length, 4.92 inches in width, and 0.94 inches in height, which makes the ice tea maker silicone molds stronger and more long-lasting. The silicone ice cube tray square ice cube mold can withstand long term cold storage without breaking. Enjoying an iced coffee or cocktail at any time, this coffee ice cube tray is more essential for iced coffee.

★FOOD-GRADE SAFETY MATERIAL: Made of Silicone material certified by LFGB, these 2 ice cube trays safety and durability, excellent for crushed ice, coffee, smoothies, frappucinos, hard candy, and chocolate bites.
Pulse vs. Continuous Blending for Tough Foods
Start with short pulses rather than continuous blending when processing tough foods like nuts, herbs, or dense chunks. Pulsing allows you to control the breakdown of ingredients gradually, reducing the risk of over-processing into a paste. This technique also minimizes heat buildup and motor strain, helping your immersion blender stay cooler and last longer. Use a few quick bursts to chop or crush, then pause to check the texture before deciding whether to pulse again. For precise results when making frozen desserts, consult the best instruction book for Cuisinart ice cream maker to follow recommended pulse settings.
Once the tougher pieces are reduced to smaller sizes, switch to continuous blending for a smooth, uniform result. The ideal approach is to pulse first for initial breakdown, then blend continuously for finesse. Matching the method to the ingredient is key: coarse chutneys or herbs benefit from pulsing, while soups and sauces typically require a longer, smooth finish with continuous blending. For a similar controlled technique when brewing, using hot tea tumblers with infusers allows gradual steeping rather than over-extraction. Properly managing the pulse-and-blend cycle also mirrors the versatility of compact blending that makes a Magic Bullet a favorite for quick, small-batch tasks.
What to Avoid When Blending Hot Soups and Sauces
Avoid blending soups and sauces that are at a full, rolling boil. Remove the pot from the heat and let the surface settle briefly before blending. This step reduces the risk of violent eruptions caused by steam-driven splattering. Hot liquids can become dangerous when blended directly from a boil, so patience here is essential for safety. Always follow proper safety habits like keeping your hand away from the blade and using the pulse function for better control.
Never lift the blender while it’s running. Ensure the blade is fully submerged before turning on the mixer, and always turn it off before removing it from the pot. Lifting the blender mid-operation can cause hot liquid to splash across your stove or onto you, which can lead to burns. Proper handling means stopping the blender first.
Use a deep, narrow pot with enough headspace—at least 2-3 inches of space above the liquid. A tall container helps control the vortex during blending, reducing overflow. Avoid overfilling, which increases the chance of spills and splatters. Never seal the lid tightly during blending; trapped steam can push the lid off or cause geysering. Starting the blender on low speed and keeping it steady while blending minimizes mess and ensures safety. Ignoring unusual noises or vibrations can lead to accidents, so pay close attention throughout the process.
Clean and Store Your Immersion Blender Properly
To clean and store your immersion blender properly, start by unplugging it and disassembling it before cleaning. Detach the shafts and attachments, keeping the motor body separate. Rinse the removable parts under warm water, then wash them with mild soap and a soft brush. For stubborn buildup, create a paste using baking soda and water, then gently scrub the affected areas. Wipe the motor housing with a damp cloth, and avoid submerging it in water to prevent damage. Increase the cleaning frequency after blending sticky or fatty foods to prevent residue buildup. Dry all components thoroughly and wait at least 15 to 30 minutes to allow complete air-drying. For the lid components, soaking in warm soapy water helps dissolve any trapped residue. To prevent a stuck blender lid issue, always ensure the lid is clean and dry before reassembling. For glass straws, a similar technique of using a brush with mild soap ensures thorough internal cleaning.
For storage, keep the blender in a dry place with good ventilation. Store the motor head upright to prevent leakage or dust entry. If space allows, detach the shaft before storing to avoid clutter and make cleaning easier later. Only reassemble the blender once every part is completely dry to avoid moisture-related damage or mold growth. Proper cleaning and storage will extend your immersion blender’s lifespan and ensure it remains hygienic for your next use.